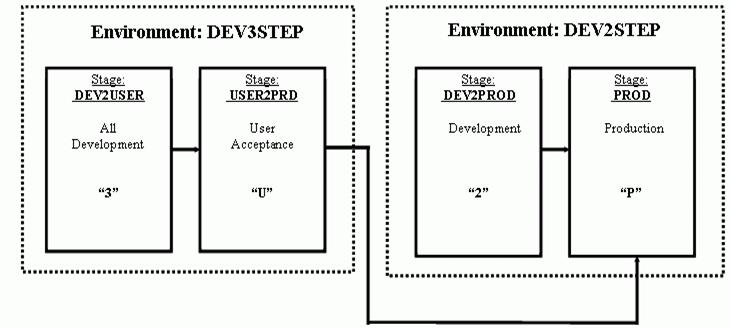
Life Cycle – The migration path/stages Test, User Acceptance and
Production
Environment is an ENVEDOR domain containing two stages
Stage is one development area containing all facets of development
System at DHHS/DIRM is its Team designation
Subsystem is usually the application code used to group code
together by business system
Type is Compiler type:
COPYBOOK
EAS*
COBOL
PSBXIB
Processor Group (ProGr) is used to further granulate the definitions within
Type
“ProGr” Naming
convention is explicit as to what
language is being compiled. The format is as follows:
CII2XB
First three positions are language “CII” is COBOL2, CMV*
is COBOL for MVS
Next position is for DB2 is “2”, for no DB2 it’s “X”
Next position is for IMS it’s “I”, for no IMS it’s “X”
Next position is “C” for CICS online, “I” for IMS
online and “B” for batch
Packages are automated move sheets used to migrate
code up from Development to Production
SCL is Source Control Language used by packages to migrate code toward
Production
Casting is the validation of the SCLs created
Approve Package is the method of approving the migration of
Production Code.
Build using Map Y or N shows programs also in “P”
“SYNC” option when migrating allows the user to override version control “on
purpose”
“JUMP” option when migrating allows code to be migrated from an alternate
source.
The Parallel Development
Model is designed to do all development and maintenance side by side while
being able to manage migration to Production, keeping all of the code in sync.
In today’s environment at least 35 libraries are
needed to contain all of the control cards, source code, copybooks, maps, etc,
in production. In order to support production, another 35 libraries are needed
to support a testing environment and 35 more libraries to support a user/system
test environment. That exact configuration, with 105 libraries will support a
“3 stage life cycle”
The need for concurrent development
would cause us to expand using Parallel Development Methodology (PDM). A PDM
development line is a replication of the original development line. It migrates
to the same production libraries as the original development line.
In the above example TEAM51 can test within the BDA
development line using PROGRAM0 PLAN1 DB2Plan while another programmer can be
testing, the same program, within the T51PDM1 development line using the PLAN2
DB2Plan, this is accomplished using unqualified COBOL/DB2 code. This will allow
the programmers to actually do concurrent changes on the same programs.
Note: To support this line is additional 70
libraries.
The entire Parallel Development Model is a 7 tier,
3-stage library system using well over 525 libraries. These libraries are organized using the
Kei-Ron naming convention. This allows the programmer the luxury of not having
to care what the library names are, but, being able to have Technical Support
pinpoint where changes need to be made when developing or maintaining
systems. Every PDM development line is a
migration path to production.
EIS
ONLY – When an EIS programmer is working on any of the PDM development
lines, all of the renaming of programs and PSBs are
being done behind the scenes. The programmer would always select an EJA program
from the Production “P” stage to be edited.
Using the TEAM51 (BDA) system, type “E”, for edit, to select a program to
be changed and immediately start editing. Endevor will do the retrieve of the
element from Production “P” and copy it to TEAM51/DEV2USER/ stage “3”. Like so…
If a change to the production version of PROGRAM0 were
needed while it’s being changed on the BDA development line, the programmer
would use a PDM development line to do the change. The alternate system is
T51PDM1. Using T%1PDM1 system when bringing up a selection list, all you would
see would be the production version.
Using
the T51PDM1 system, if you were to edit this member, it would be migrated to
“3” on the T51PDM1 development line as in the following:


Parallel Maintenance System (PMS) is used to do Maintenance changes
to elements that exist in the PDMs development
libraries when you only have one development line. It allows you to pull
programs from production, make changes, compile and migrate back to production
without deleting the existing program from development. PMS is not to be used
to do parallel development, because it uses all of the same resources defined
in the PDM system.
The real separation
is where the source code resides. While the program is in the PDM system, the
source code resides in DHR.BDA,&PDM.NDVR.DEV2USER.COBOL
and …COPYBOOK. When the program is in
the PMS system, the source code resides in DHR.BDA,&PMS.NDVR.DEV2USER.COBOL
and …COPYBOOK. The PMS system uses the
exact same processor, ProGr, input, output and
listing libraries.

The two
programs are in three systems, TEAM51, T51PDM1 and T51PMS1. T51PDM1 and T51PMS1
are sharing the PDM1 development line, as in the above example. They each have
their own source libraries, but, because both systems are on the same PDM,
they share resources like:
HR.BDA.PDM1.DEV2USER.DB2DBRM
DHR.BDA. PDM1.DEV2USER.BINDLIB
DHR.BDA. PDM1.DEV2USER.LOADLIB
DHR.BDA. PDM1.DEV2USER.CICS.LOADLIB
DHR.BDA. PDM1.DEV2USER.IMS.LOADLIB
They don’t share source libraries,
the PMS1
system uses: DHR.BDA.PMS1.NDVR.DEV2USER.COBOL
and …COPYBOOK
The
PDM1 system uses: DHR.BDA.PDM1.NDVR.DEV2USER.COBOL and …COPYBOOK.
Once the
program in the PMS system is migrated to USER2PRD and then to PROD the program
which remained in the PDM system can be regenerated or recompiled When the PDM
version migrates to Production it will be necessary to use the SYNC=Y option,
because of the PMS version updating the element causes a controlled out of SYNC
condition.
“M” beside the
program name will display the latest historical information. There are two
screens, hitting enter will toggle back and forth between screens.


“LO”
besides the program name will display the component list. The main components
are the load module and the listings. The listing contains all of the condition
codes as well as the listings from the last action. When code is migrated this
listing will be appended with the condition codes of each move.
“L” to select
STORLIST for PROGRAM0
“E” uses the ISPF Editor as the editor for ENDEVOR.
All of the editing tools are the same. You must set “RECOVERY ON” in order to take advantage of ISPF’s
recovery feature during your edit sessions.
“CR” creates the element. It is imperative that this
screen is filled out completely.
The
“TYPE” and “Processor Group” fields are critical to deterring how this program
is compiled. The “TYPE” identifies this program as COBOL. The ProcessorGroup identifies it as a Batch, no DB2, no IMS
When creating “CR” or modifying “E” elements using
QuickEdit, the use of the SAVE option is the same. When ending an editing
session hit “PF3” or type END and you will save the element …
After
hitting PF3 or typing END you are ready to generate the element. If you just
want to quit editing without generating the element hit PF3. If you want to
generate the element, hit enter to submit the ENDEVOR job to execute the generate. The generate is an
ENDEVOR activity which creates footprints and Syncs the code. And updates the ENDEVOR stats. In the case of COBOL it also
submits a PROCESSOR which will compile the program in DEV2USER.
To generate the element without editing, select the
element with a “G”
After testing is complete the element is ready to be
entered into a package to be moved to the next stage. Select “P” to use the
“Package options”.

This brings you to the ENDEVOR Package Foreground
Options Menu
Create or modify the package being setup to move a
program(s), copybook(s) or project. It could be useful to create the package
early by entering elements as they get finished. This way the Package could be
used as a checklist. The package will not be executed until it is complete and
is “CAST” and “APPROVED”.
Packages are used to migrate
code to Production. Programs are compiled in DEV2USER but they are moved to
USER2PRD and then to PROD. The source code, Load Module, DBRM and the listing are
moved together from one stage to another. They are also deleted from whence
they came.
When a package containing DB2 programs is moved to
USER2PRD it must be bound to the DB52 DB2 Catalog and when moved to PROD it
must be bound to DB01. This is important because when a DB2 program needs to be
bound to DB52 the job must be run on the WPAR. When it is to be bound to DB01
the job must be run on the ALPAR.
Package naming convention “DV” and “PR” control this. When a package
name starts with “DV” it is executed on the WLPAR and “PR” will execute on the
ALPAR. The rest of the name is arbitrary. A typical name would be as follows:
PRTS20030801ADP (16 characters
is the limit)
PR =
execute on the A-LPAR
TS
stands for Technical Service
20030801 = date
ADP
= creators initials
Packages are submitted for
execution every 15 minutes, 24x7. As long as your package is approved it will
be executed There is a job that is submitted by ZEEK every 15 minutes that
checks for packages that are eligible for execution ;
however, if your package is elegable but has not
executed within 1 hour, send a request to [email protected] with the subject as follows: Package hasn’t EXECUTED for 1 hour.
Creating ENDEVOR Packages is the process of creating
an online move sheet. When creating a Package the first rule of naming is
determined by the LPAR in which it will be executed. The package will execute
on the WLPAR if the package name starts with “DV”. The Package will execute on
the ALPAR if the name begins with “PR”. This is important because if a DB2
program is being moved it will have a bind run as part of the move process. The
bind for production must execute on the (DB01) ALPAR and the test programs must
execute the bind on the
(DB51 or DB52) WLPAR

Select
“2” to create or modify a package.
When
building a package there are three fields that are important:
1) The name of the package will determine what LPAR it is
executed on
2) ENABLE BACKOUT
===> Y (Y/N)
This is only useful for a production move. It encrypts
the name of the replaced member in the load library only. If a Backout is called for the new element is swapped with the
new and encrypted member. The load
module only.
3) EXECUTION WINDOW FROM ===> 21APR00 00:00 TO ===> 31DEC79 00:00
The execution window allows the action to be completed
at a specific time. In the case of programs running in IMS or CICS there is a
need to not move the production element and have the DB2 bind until after 5:30pm when the region comes down. This will allow the IMS
LLA to be refreshed and the CICS region will have brought in all new copies
when it comes up.
“B” for building a package will lead you to the SCL
GENERATION screen.
It’s
a safe guess that you will only be moving programs with packages, so the build
process is easy. Select 5 for “MOVE”. The option for moving an element is “O” for mOve

.
look for the
confirmation screen
The SCL created to move
PROGRAM0 to production.

The member can be selected from the MOVE ELEMENT
screen or from a selection list by leaving the element name field blank. When the package is built Hit F3 until back to “Package Foreground
Options Menu”. The next task to do is to CAST the package.
Casting
a Package will verify not only syntax but will also make sure the element is
ready to be moved.
If
a Package is requesting a move of an element that has not been generated as its
final action it will tell you by sending you to an error screen.
In
this case you need to go generate the element and then come back and cast it
again. However if you are successful you will receive the following message
Once
a Package is CAST it is awaiting EXECUTION; its status would be Approved,
if it were a “DV” package and InApproval if it’s a “PR” package. In the case of
In-Approval, one of Management’s designates must approve the package for a
production move The approval process is to satisfy the auditor requirement that
two sets of eyes see all changes made to software owned by the state of North
Carolina.
Packages are executed automatically every ½ hour or
so, 24x7. As of version 3.8 the user may execute his/her own
package. However, if you are migrating to UAT you must be logged into WLPAR. If you are migrating to production you will
be able to submit a job to execute a package, but you may not have the
authorization to do so, and the job will fail.
But thanks for playing. aRtie.
The
Team Leaders designate must approve all Production packages. The approval
process is to satisfy the auditor requirement that two sets of eyes see all
changes made to software owned by the state of North Carolina.

This
is the good part… Only the packages they
are authorized and are eligible for “REVIEW” will showup
on the screen, it’s “Manager Proof”. No training required.


It is the
responsibility of the programmer to check the status of the package being moved. This is an automated system and does not acknowledge
your deadlines, just helps you keep them.

This screen shows time
frame and status. Package are executed every half-hour
24X7. If a package is eligible for execution and has not executed within 1
hour, assume the worst. The automatic job has to be restarted in ZEEK. Send a
request to [email protected] with the subject as follows: Packages not EXECUTED for 1 hour. If
a package is executed correctly the Status will be as follows:
If the package does not
work The status will be “EXEC-FAILED”; the package should be checked in SystemWare to get a
better picture of what happened.
This will lead to next
screen, where you select the package by date and time that matches the Status
screen in =O.O.L;1;2;4;1


Package Backout and Backin
Should
you discover a problem once you have executed the package, or if the execution
failed, you can undo the effect of the execution using the Backout
option. For example, assume your package executed
successfully, but it’s execution caused other problems
elsewhere in the system. You can undo the execution and return the load modules
outputs of the package to the state they were in prior to being executed. Backin reinstates the outputs.
Why Backout Does Not
Affect Source
Package Backout is designed to restore load modules and other
executables to their pre-package execution state. Backout
doesn’t restore the source to its previous image, because the bad source is the
audit trail of the change. The audit trail should not be disturbed for any
reason, because it allows you to view change history and changes only on-line,
facilitating problem resolution.

Package
Display screen shows the package has been executed and ended with ENDEVOR RC
0000. Use option B to display backout information.

When
there is a problem with the move, as in the following example, no listing was
available to move, the BACKOUT will backout the
components that were sussesfully migrated.

The
only component that is not backed out
is the source. This keeps the audit trail in tact. All of the components that
were backed out have really only had a name change with the encrypted member
created when the original package was executed. There ia a counter part to the BACK-OUT, the BACK-IN.
The
BACK-IN is used to restore the package to it’s executes state.
The
BACK-IN is used to restore all of the components to the state they were in
before the backout. In our example, we only moved one
program. If there were 10 programs in the move package and one of them was bad,
all but the one being fixed need to be backed in. The steps to accomplish this
task are as follows:
1) BACK-IN the package in it’s entirety
2) Create/Execute a new package with the new code for the
problem program
Make
sure you have the following settings on your TSO and Endevor sessions:
On your TSO
login your size setting must be 64000
On your Endevor defaults: O.O.L;1;2;0
When you get a “ALLOCATION ERROR”
trying to save your source in Quick Edit, to keep from losing your changes:
COMMAND ==> CRE [member name]
On the first line of your source
code, where your numbers are, type “C99999”
Then press enter.
For
ALL problems
send Email
[email protected]
ENDEVOR Technical Support
Be descriptive, but brief